
Migrating from NPM to PNPM
PNPM has been touted as a more performant and reliable replacement for NPM, aiming to reduce slow build times and eliminate issues with dependency mismatches. I primarily investigated PNPM as a way of speeding up the completion times for CI pipelines, as well as having a better package manager to use during development cycles.
Preface
I tested this on a project that is still in the alpha phase of development and therefore could afford any potential downtime from errors or other issues. It would be unlikely that replacing your package manager with PNPM would cause any breaking changes when the app is deployed, but it should definitely be tested in a staging environment first if an application is already live.
The only potential issue would be dependency mismatches, but I have described this in more detail further down in this blog post.
Getting started
-
Installation guide for PNPM can be found here. The simplest approach for JS folks is probably to run:
npm install -g pnpm. -
In the project which you want to convert to PNPM, find the node_modules directory and delete it.
-
Add the following code to your project’s package.json. This will prevent people from installing packages with any other package managers.
"scripts": { "preinstall": "npx only-allow pnpm", ... }
- In directory root, create a file named
pnpm-workspace.yamland add the following:
packages:
  # include packages in subfolders (change as required)
  - 'apps/**'
  - 'packages/**'
  # if required, exclude directories
  - '!**/test/**'
-
In terminal, run
pnpm import. This will create a pnpm-lock.yaml file based on the current yarn.lock or package-lock.json. -
Delete yarn.lock or package-json.lock file.
-
Install dependencies using PNPM by running
pnpm iorpnpm install -
If you have scripts in package.json that use
npm runprefix, this will need to be replaced withpnpme.g.pnpm testinstead ofnpm run test
Important note
When installing dependencies with NPM or Yarn, a ‘flat’ node modules directory is created. This means that source code has access to dependencies that are not added as dependencies to the project. PNPM works differently in that it uses symlinks to add only the direct dependencies of the project into the root of the modules directory.
For example, if you have package A that imports a package B
import something from 'B'
but doesn’t explicitly specify B in the dependencies of the project, then the execution will fail.
Not only does this new structure improve build performance, but it also reduces the likelihood of dependency bugs occuring within a project. This article gives a good breakdown of how that works.
If you do come across a situation where you need a flat node modules structure like the one that NPM or Yarn creates, PNPM provides an escape hatch to do so:
pnpm install --shamefully-hoist
Although this should be avoided wherever possible, since it goes against the design pattern that PNPM implements. An example of when you might need to use this is where a dependency you have installed relies upon a package that is not explicitly specified in the root dependencies.
Working with PNPM
When you first run pnpm install you will see a progress graphic in the terminal like the one in the image below:
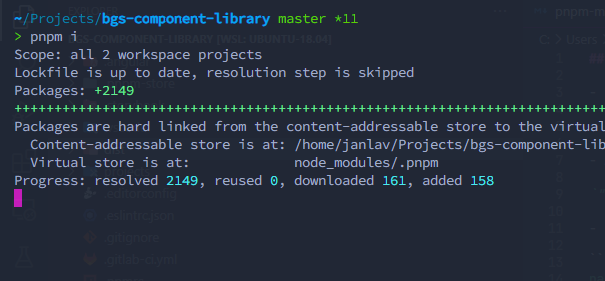
Note that the ‘reused’ count stays at 0 on the first install. This is because we haven’t yet created a cache that PNPM can reference.
Once all the dependencies have been installed, if you run pnpm install again or add a new package pnpm add some-new-package -w, you will see that the ‘reused’ counter is now going up.
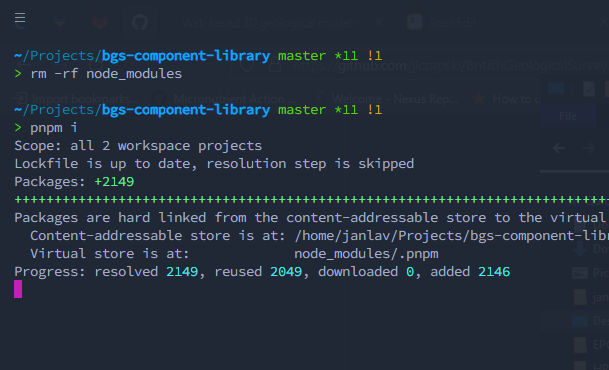
This caching speeds up the installation process quite drastically, as it avoids re-downloading packages that have already been fetched. Packages are also downloaded concurrently instead of one-by-one.
“In pnpm, packages are always reused if they are already installed for another project saving a lot of disk space which makes it faster and more efficient than npm.”
PNPM and CI pipelines
My main aim when first investigating PNPM as a replacement package manager was to speed up the times of my CI pipeline, which would often sit for 10 or 15 mins, even for a project that wasn’t particularly complex and had no e2e tests to run.
With that in mind, here is an example .gitlab-ci.yml file with a simple deploy script to Gitlab pages that shows how I made use of PNPM.
image: node:16.14.0
before_script:
  - curl -f https://get.pnpm.io/v6.16.js | node - add --global pnpm@7
  - npm config set store-path /root/.pnpm-store/v3
  - npm config set registry <nexus url>
pages:
  stage: deploy
  interruptible: true
  cache:
    key: $CI_COMMIT_REF_SLUG
    paths:
      - /root/.pnpm-store/v3
      - public/
      - ./node_modules
    policy: pull
  script:
    - pnpm install
    - pnpm build-storybook
  artifacts:
    paths:
      - public
  only:
    - master
You can see that in the before_script stage we make a CURL request to download PNPM. Then we set the store path to the location of our new PNPM cache store.
This path may differ for your project. I found the correct path for mine by adding pnpm store path to my previous CI script, running the pipeline and then copy/pasting the path it gave me.
After this, we ensure that the registry is using Nexus to install packages.
The next important section is the ‘cache’ section. This will most likely be similar to your existing setup, except that we need to add to ‘paths’:
- The PNPM store path which was previously mentioned, e.g.
/root/.pnpm-store/v3 - ./node_modules
Normally we would have .npm in the paths array, but this can now be removed.
We make use of the cache key $CI_COMMIT_REF_SLUG which allows us to share cache between jobs in the same branch e.g. master. After the initial run, when we run a pipeline, we should see the ‘reused’ counter going up if PNPM is hitting the cache successfully.
Finally, in the script section, we run our new pnpm install command, and then any other project-specific commands which need to be run (build-storybook) in my case.
Other PNPM features
Another useful feature that PNPM has is the ability to manage Node versions. A lot of us currently use nvm for this & it works in pretty much the same way.
Some examples:
- Install the LTS version of Node:
pnpm env use --global lts - Install Node 16:
pnpm env use --global 16 - Install the latest version of Node:
pnpm env use --global latest - Remove a specific version of Node:
pnpm env remove --global 14.0.0
A useful example which matches the process we currently use is to have an .npmrc file in project root which defines the Node version:
use-node-version=16.14.0
When we then run pnpm start, it will pick up this Node version from the config file and use it in our project. Having the ability to manage Node versions with our default package manager is quite handy.
Final notes
You may well need to add .pnpm-store/** to your .gitignore file.
The docs for PNPM are very helpful & quite detailed.
CI pipeline using existing NPM setup

CI pipeline using PNPM

⚡
comments